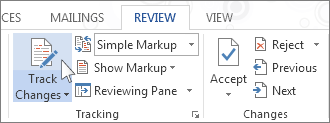
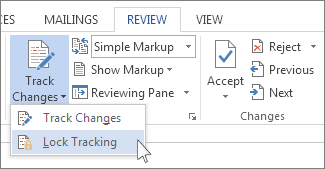
Source: https://nybookeditors.com/2015/01/copyediting-vs-line-editing/ Many authors don’t fully grasp the difference between a line edit and a copyedit. There are some similarities between the two: both pay detailed attention to your use of language, and involve mark-up on the pages of your manuscript. But make no mistake, these are two completely different processes, handled by professionals with different skill sets, and should occur at very different times during the writing process. A line edit addresses the creative content, writing style, and language use at the sentence and paragraph level. But the purpose of a line edit is not to comb your manuscript for errors – rather, a line edit focuses on the way you use language to communicate your story to the reader. Is your language clear, fluid, and pleasurable to read? Does it convey a sense of atmosphere, emotion, and tone? Do the words you’ve chosen convey a precise meaning, or are you using broad generalizations and clichés? An editor may draw your attention to: The purpose of working with a general editor in this way is not just to improve your current manuscript, but to give you the creative tools to become a better writer in ways you can carry with you to future projects. By contrast, the goal of a copyedit is to address flaws on a very technical level – to make sure the writing that appears on the page is in accordance with industry standards. This is like an incredibly high-end proofread. A copyedit: Internal consistency means your plot, setting, and character traits don’t have discrepancies. For example if on page 41 you write: Rosemary wore her blond hair in a bun, and then on page 67 you write Rosemary brushed her long black hair, it’s a copyeditor’s job to point that out. There will be some overlap between the work of a general editor and a copyeditor. Most developmental editors will point out technical errors or logical inconsistencies when they jump out, because they’re trying to make your writing better, and because editors tend to be perfectionists by disposition (guilty as charged!). But it is not the specific purpose of a line edit to comb through your prose, fix your grammar, typos, capitalize proper nouns, or change all spellings of colour to color because we’re in America, not Britain. This is the job of a copyeditor, and it requires a rule-based understanding of standard American English usage that traditional editors don’t have. As such, your copyedit will come with a “style sheet” that explains how these rules and principals apply to specific things in your manuscript. So while your general editor will probably not have the Chicago Manual of Style committed to memory, your copyeditor might. There is one other reason that line editing and copyediting aren’t the same job: copyediting should always come after line edit, never at the same time or before. The page-by-page, sentence-by-sentence content of your manuscript should be completely finalized before being fine-tuned on the level of a copyedit. Because what is the point of spending time (and money) proofreading portions of an early draft that might be significantly altered, or even completely cut, by the time the final draft rolls around? At a publishing house, a copyeditor is usually the last person who touches the text of a manuscript before it goes into production – after the editor who bought your manuscript has taken you through revisions and given the final sign-off on your book’s content. So, to make a sweeping and totally reductive generalization, the job of a general editor is to help you tell a better story, and the job of a copyeditor is to make sure the grammar on every page is correct. Just in case you’re still a little unsure, here are a couple of examples that show how a developmental editor and a copyeditor might work on a similar piece of text. These examples are adapted from an earlier post you might want to check out, called The Biggest Mistake Beginning Writers Make. EXAMPLE 1) Original passage: She reluctantly handed over her purse, and nervously waited to have it placed back in to her hands. She felt a rush of relief as the Security Guard finished his search after 30 seconds and handed it back to her. The same passage, after a line editor has helped the author rewrite it so that it reads more fluidly: She was reluctant to hand over her purse, and felt a rush of relief as the Security Guard finished his search and placed it back in to her hands 30 seconds later. And the same passage, after it’s been copyedited for grammar and usage (with edits in bold): She was reluctant to hand over her purse, and felt a rush of relief as the security guard finished his search and placed it back into her hands thirty seconds later. EXAMPLE 2) Another Original passage: The rising light of the sun was quickly brightening. Dawn was turning into morning. Alex finished reading her copy of the “New York Times” and put the paper down on the table, and then grabbed her ipod and put on Beyoncé’s Crazy in Love and went out for her mourning run. After a line editor has helped the author to rework it so that it reads more fluidly: The dawn light brightened, giving way to morning. Alex tossed “The New York Times” onto the table, grabbed her ipod, and then put on Beyoncé’s Crazy in Love as she headed out for her morning run. *Notice here, the line editor caught and fixed a couple of technical errors, like the typo on the second use of “morning” and the inclusion of “The” as part of the newspaper’s title. But even more is fixed… After the passage has been copyedited for grammar and usage: The dawn light brightened, giving way to morning. Alex tossed The New York Times onto the table, grabbed her iPod, and put on Beyoncé’s “Crazy in Love” as she headed out for her morning run. When you want to see who’s been making changes to your document, turn on the Track Changes feature. On the Review tab, in the Tracking group, choose Track Changes. When you turn on Track Changes, Word marks up new changes made to the document. When you turn off Track Changes, Word stops marking up new changes. Any changes that were already tracked remain marked up in the document until you remove them.
When you turn on Track Changes, Word marks up and shows any changes that anyone makes to the document.
On the Review tab, in the Tracking group, in the Simple Markup list, choose a view option.
Simple Markup is the default option, and indicates where changes are with a red line in the margin.
No Markup hides markup to show what the incorporated changes will look like.
Note: You can see the markup again by choosing Simple Markup or All Markup.
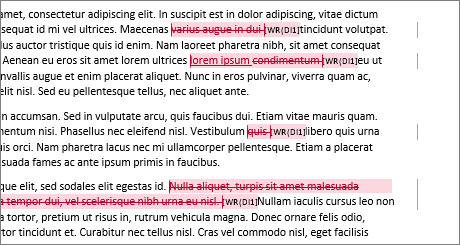
All Markup shows all edits with different colors of text and lines.
Original shows the document in its original form. In the Show Markup list, choose the revisions you'd like to see—Comments, Ink, Insertions and Deletions, Formatting, Balloons, Specific people. You can prevent someone else from turning off Track Changes by turning on Lock Tracking and adding a password. When Tracked Changes is locked, you can't turn off the feature, and you can’t accept or reject the changes. On the Review tab, in the Track Changes list, choose Lock Tracking.
Do one of the following: In the Lock Tracking dialog box, enter a password, type it again in the Reenter to confirm box, and then choose OK.
Note: Adding a password is optional. It's not a security feature. It is intended, however, to discourage others from turning off Track Changes. In the Lock Tracking dialog box, choose Cancel.
Turn off Lock Tracking
In the Track Changes list, choose Lock Tracking. If you added a password, enter it when prompted, and then choose OK.
Note: Track Changes is still on, but you can accept and reject changes. The only way to remove tracked changes in a document is to accept or reject them. Choosing No Markup in the Display for Review box helps you see what the final document will look like—but it only hides tracked changes temporarily. The changes are not deleted, and they’ll show up again the next time anyone opens the document. To delete the tracked changes permanently, accept or reject them.
Accept or delete a single tracked change
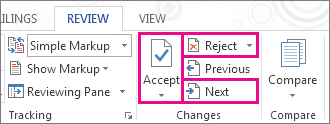
Open your document. On the Review tab, in the Changes group, choose Next or Previous. Choose Accept or Reject.
Accept or delete all tracked changes
Open your document. On the Review tab, in the Changes group, do one of the following: In the Accept list, choose Accept All Changes. or In the Reject list, choose Reject All Changes. Word either accepts the change or removes it, and then moves to the next change.
View comments
Word shows a balloon where someone’s made a comment. To see a comment, choose the comment balloon.
To see the changes, click the line near the margin. That action switches Word into All Markup view.
Delete a single comment
Choose a comment, and on the Review tab, in the Comments group, choose Delete.
Delete all comments
On the Review tab, in the Comments group, in the Delete list, choose Delete All Comments in Document.
Tips: Before you share the final version of your document, it’s a good idea to run Document Inspector. This tool checks for tracked changes and comments, hidden text, personal names in properties, and other information you might not want to share widely. On the File tab, choose Info > Check for Issues > Inspect Document. To learn more about comments, see Insert and delete comments. A valuable feature is the ability to
track changes made to a story by each contributor in the writing
and editing process. Whenever anyone adds, deletes, or moves text
within an existing story, the change is marked in the Story Editor
in InDesign or the Galley and Story views in InCopy. You can then
accept or reject the changes. Use the Track Changes panel in InDesign or the Track Changes
toolbar in InCopy to turn Track Changes on or off and to show, hide,
accept, or reject changes made by contributors. Choose Window > Editorial > Track Changes
to open the Track Changes panel (InDesign), or choose Window >
Track Changes to open the Track Changes toolbar (InCopy). With
the insertion point in text, do any of the following: To enable change-tracking in only the current story, click
the Enable Track Changes In Current Story icon (InDesign) To enable tracking in all stories, choose Enable
Track Changes In All Stories from the Track Changes panel menu. (InCopy) To enable tracking in all open stories in a multistory
document, choose Changes > Enable Tracking In All Stories. Add, delete, or move text within the story as needed. Note:
When Track
Changes is turned on, a track changes icon When
Track Changes is turned on, each change is marked by default as
follows in Story Editor (InDesign) or in Galley and Story views
(InCopy): Note:
The Track Changes section of the
Preferences dialog box lets you choose a color to identify your
changes. It also lets you select which changes (adding, deleting,
or moving text) you want tracked and the appearance of tracking. Added text Highlighted.
Deleted text Highlighted and marked with a strikethrough.
Moved (cut-and-pasted) text Highlighted and marked with a strikethrough in its original location; highlighted and boxed in the new location. Note:
If you cut text from one document and paste it into another, it is displayed as deleted text in the document of its original location and as added text in its new location.
Copied text Highlighted in the new location. The original text is unchanged.
Change bars A change bar
is a vertical line that appears to the left of a line of text that
has been changed. You can choose whether to show or hide change bars
as you work. You can also specify what color to use for displaying
the change bars. When
changes are hidden, the text appears as it would with the change-tracking feature
turned off. That is, added text is visible, deleted text is invisible,
and moved or pasted text appears where it has been inserted. (InDesign) When change-tracking is turned on, editing is tracked
regardless of whether you work in Story Editor or in the document
layout. You can view changes only in Story Editor, not in the layout. (InCopy) When change-tracking is turned on, editing is tracked
regardless of whether you work in Galley, Story, or Layout view.
You can view changes only in the Galley and Story views, not the
Layout view. In the Track Changes panel (InDesign) or the Track Changes
toolbar (InCopy), click the Show/Hide Changes button With
the insertion point in text, do any of the following: To disable change-tracking in only the current story, click
the Disable Track Changes In Current Story icon (InDesign) To disable tracking in all stories, choose Disable
Track Changes In All Stories from the Track Changes panel menu. (InCopy) To disable tracking in all open stories in a multistory
document, choose Changes > Disable Tracking In All Stories. Note:
If you disable tracking, no further changes are tracked. Previously
tracked changes are not affected. Choose
Window > Track Changes. Click the insertion point in a change. The Track Changes
panel displays the date, time, and other change information. When changes have been made to a story,
whether by you or by others, the change-tracking feature enables
you to review all changes and decide whether to incorporate them
into the story. You can accept or reject single changes, only portions
of a tracked change, or all changes at once. When you accept a change, it becomes a normal part of the text
flow and is no longer highlighted as a change. When you reject a
change, the text reverts to how it was before the change was made. In Story Editor (InDesign) or Galley or Story view (InCopy),
position the insertion point at the beginning of the story. In the Track Changes panel (InDesign) or the Track Changes
toolbar (InCopy), click the Next Change button Do any of the following: Note:
To accept or reject the highlighted change and
go to the next change, Alt-click (Windows) or Option-click (Mac
OS) the Accept Change or Reject Change button. To move back to the previous change or skip over a change and go to the next one, click the Previous Change button To accept or reject all changes without reviewing, click the Accept All Changes In Story button To accept or reject all changes in the story or in the document, or to accept or reject all changes by a certain participant, choose the appropriate option from the Track Changes panel menu (InDesign) or from the Changes menu (InCopy). Note:
If you change your mind about accepting or rejecting a change,
you can undo the change by choosing Edit > Undo or pressing
Ctrl+Z (Windows) or Command+Z (Mac OS). Choosing an Accept All Changes or Reject All Changes command
also applies to hidden conditional text. Preference settings let you
control many tracking options. You can choose a color to identify
your changes and select what changes you want tracked: adding, deleting,
or moving text. You can also set the appearance of each type of
tracked change, and you can have changes identified with colored
change bars in the margins. Choose Edit > Preferences > Track
Changes (Windows) or InCopy > Preferences >
Track Changes (Mac OS). Select each type of change that you want to track. For each type of change, specify the text color, background
color, and marking method. Select Prevent Duplicate User Colors to ensure that all users
are assigned different colors. To show change bars, select the Change Bars option. Choose
a color from the Change Bar Color menu, and specify whether you
want change bars to appear in the left or right margin. Select Include Deleted Text When Spellchecking if you want
to spell-check text marked to be deleted. Click OK. By Alex Painter Would you trust a five star hotel offering 'luxry accommodation'? Or an online retailer who asked for your 'adress' in a contact form? I wouldn't. And I'm not alone. However, even if you believe that most of your customers don't care about spelling errors, ignoring those who do is terrible business practice. Of course, it's not just spelling. Inconsistencies and poor grammar can be just as off-putting. In reality, most organizations appreciate their importance. When mistakes do occur, it's rarely because people don't care. More often than not, it's a combination of a lack of skills and inadequate processes that gets in the way. So here are five tips that will help you to avoid those embarrassing errors. If you don't have one, create a house style for your organization. What do I mean by that? Well, this is really about consistency, and it's especially important in larger organizations, where brochures, catalogues, websites and ads may be written by teams of different people, some from external organizations, such as advertising or PR agencies. The point is that, by and large, all these communications should share a single 'voice'. They should read pretty much as though they were all written by the same person. Don't get me wrong – I'm not saying that your corporate brochure copy should look just like the copy on your 48-sheet poster. Much depends on the audience and the medium. But there are some basic things that should always be consistent. If you're unsure how to get started, there's a useful guide to building your house style here. This is a simple but important point. People often check the fine details meticulously, while missing mistakes that, on the face of it, should be obvious. So, for example, when you're proofreading advertising copy, pay particular attention to headlines. It's all too easy to skip over them, assuming that there can't be a mistake in the headline because someone would have noticed. That someone should be you! This distinction is essential to making sure you don't end up in an endless cycle of writing and rewriting. Very broadly, proofreading is mainly about checking for mistakes that might have crept in between the editing stage and the design / typesetting stage. The proofreader is also expected to pick up clear errors that were missed during editing. Copy-editing is also about picking up errors, but in addition it can involve rewriting parts of the text (e.g. to make it clearer). Why is it so important to know the difference? It's partly to do with drawing a line under the editing process (see point 4, below), but it's also to ensure that each task is done by the person best suited to it. For example, advertising copy is often carefully crafted to have a certain effect on the reader, and you need to make sure that that work is not undone in the proofreading process. People can be excellent proofreaders without being great writers, and writing for marketing purposes is a separate skill in itself. It's important to understand that changes late in document production are likely to be more costly than those made early on. What does this mean? Well, imagine you're producing a brochure. You start by writing the copy, perhaps in MS Word. At this point, if you have to make changes to the copy, it's as simple as editing that Word document. Now consider the next stage. You send your document to a designer who inputs the text into their design using desktop publishing software. If you make a change now, depending on its extent, you have to bear in mind its impact on the design. Will the text now spill over onto another page? Is there enough room to accommodate it? Do you also apply the same change(s) to your original Word document, just in case you need to re-use the text? Generally speaking, changes at this point take longer, cost more and raise the risk that further errors will be introduced. One lesson to draw from this is that it's worth getting copy and design signed off separately. Most organizations require a sign-off from a senior member of staff, such as a director. Often this happens only right at the end of the process, when a printer's proof is available. If that director then decides to make sweeping changes, it can create terrible headaches, as well as risk missing deadlines and exceeding budgets. When you read back something you wrote, you tend to see what you intended to write, not what is actually on the page. It's therefore easy to miss errors in your own writing, no matter how careful you are. If at all possible, find somebody else to check your writing. Getting it right 100% of the time is impossible. But with good processes and great tools, you can save money and keep errors to a minimum. Alex Painter has worked in marketing for fifteen years and has been involved in training in publishing skills for the last ten. He works for Editorial Training, an organization that runs courses in proofreading editing and grammar, including a course dedicated to proofreading for business.
January 2015
What’s a Line Edit?
In That Case, What’s a Copyedit?
Track changes in Word
Source: https://support.office.com/en-us/article/Track-changes-in-Word-197ba630-0f5f-4a8e-9a77-3712475e806a#ID0EAABAAA=2016,_2013
Applies To: Word 2016 Word 2013 Word 2010 Word 2007 Office 2007
Turn Track Changes on or off


Adobe InCopy: Tracking and reviewing changes
Source: https://helpx.adobe.com/incopy/using/tracking-reviewing-changes.html
Track changes
![]()
A.
Change bars B.
Added
text C.
Deleted text D.
Moved
text (from) E.
Moved text (to)
Turn on change tracking
![]() .
.![]() appears
at the right end of the Story bar in Galley view and Story view.
appears
at the right end of the Story bar in Galley view and Story view.
How change tracking is displayed
Show or hide changes
![]()
Turn off change tracking
![]() .
.
View change information in the
Track Changes panel
Accept and reject changes
![]()
![]() .
.![]()
![]() or Next Change button
or Next Change button ![]() .
.![]() or the Reject All Changes In Story button
or the Reject All Changes In Story button ![]() .
.
Set Track Changes preferences
Change the user name and color
Five Proofreading Tips for Businesses
Source: http://www.intelligentediting.com/resources/five-proofreading-tips-for-businesses/
1. Use House Style
2. Watch for Errors That Are Hiding in Plain Sight
3. Understand the Difference Between Proofreading and Copy-editing
4. A Good Sign-off Process Reduces Cost
5. Make Sure the Proofreader Is Not the Same Person as the Writer
Sunday, June 11, 2017
What is the Difference Between Copyediting and Line Editing?
Change tracking shown in Story Editor (InDesign)
Choose
File > User.
Specify the user name and color to be used for change-tracking
and notes, and then click OK.
Posted by Joyce Kavitsky at 6/11/2017 10:35:00 AM 0 comments
Subscribe to:
Comments (Atom)


